Configuration Guide
This guide provides a complete reference for all Dike configuration options. For initial setup, see the Getting Started guide first.
GitHub Connection Settings
Dike connects to GitHub through the GitHub App, which provides access to repository data needed for compliance scanning.
GitHub App Installation
The GitHub App grants Dike access to read repository data including commits, branches, pull request data, reviews, status checks, and workflow run results.
Installation per organization:
For each organization you want to monitor:
- In the GitHub Connections tab, click Install GitHub App
- Select the organization you want to connect
- On GitHub, choose repository access:
- All repositories - Recommended for complete compliance coverage
- Only select repositories - For limited monitoring
- Click Install
Checking installation status:
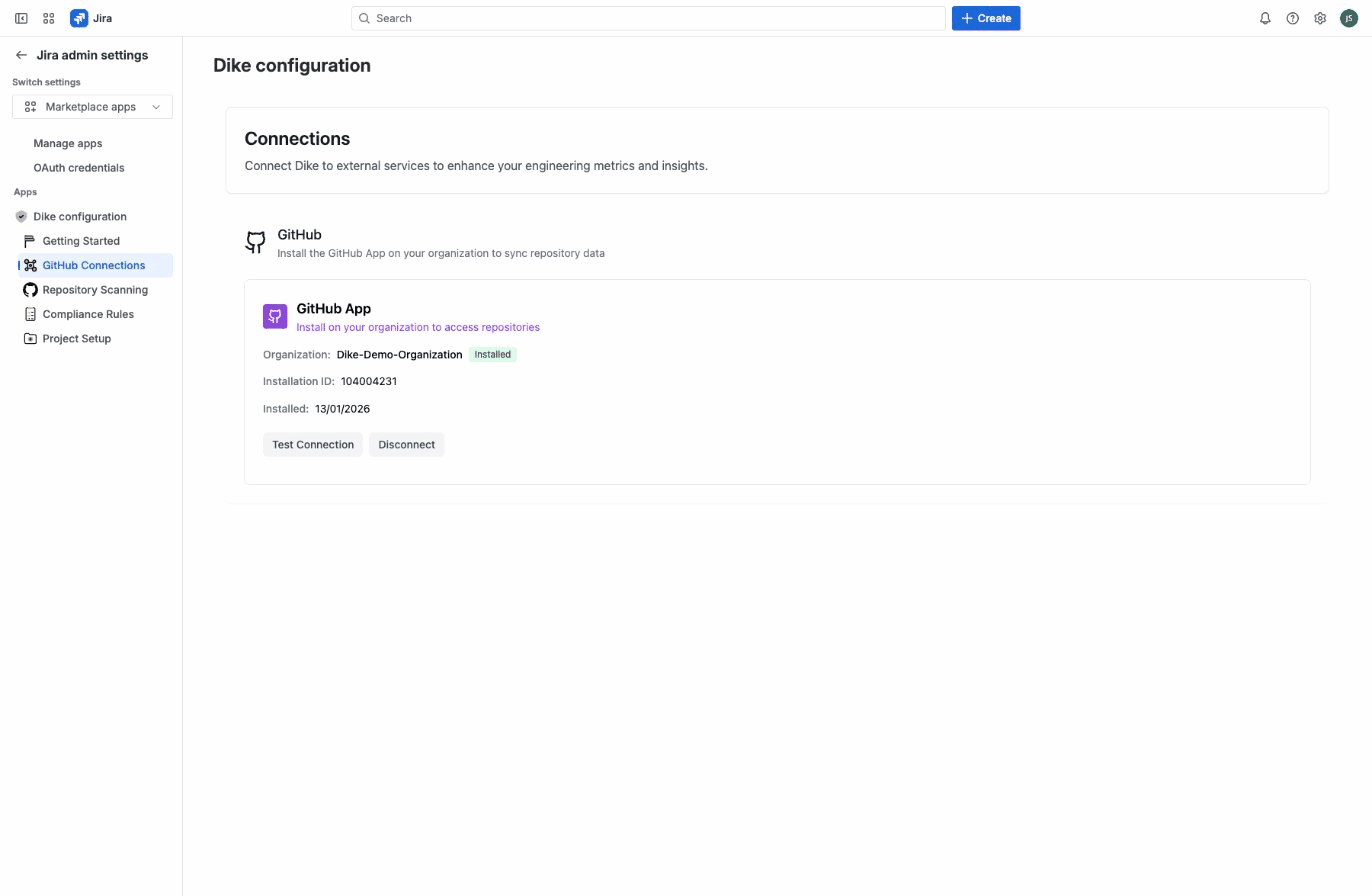
The GitHub Connections page shows for each connected organization:
- Organization name with Installed badge
- Installation ID
- Installation date
- Test Connection and Disconnect buttons
Connection Troubleshooting
| Issue | Solution |
|---|---|
| "Not connected" status | Click Connect GitHub and re-authorize |
| Organization not showing | Ensure you're a member of the organization on GitHub |
| "App not installed" | Click Install App for the organization |
| Repositories not syncing | Verify GitHub App has access to the repositories |
Managing Repositories
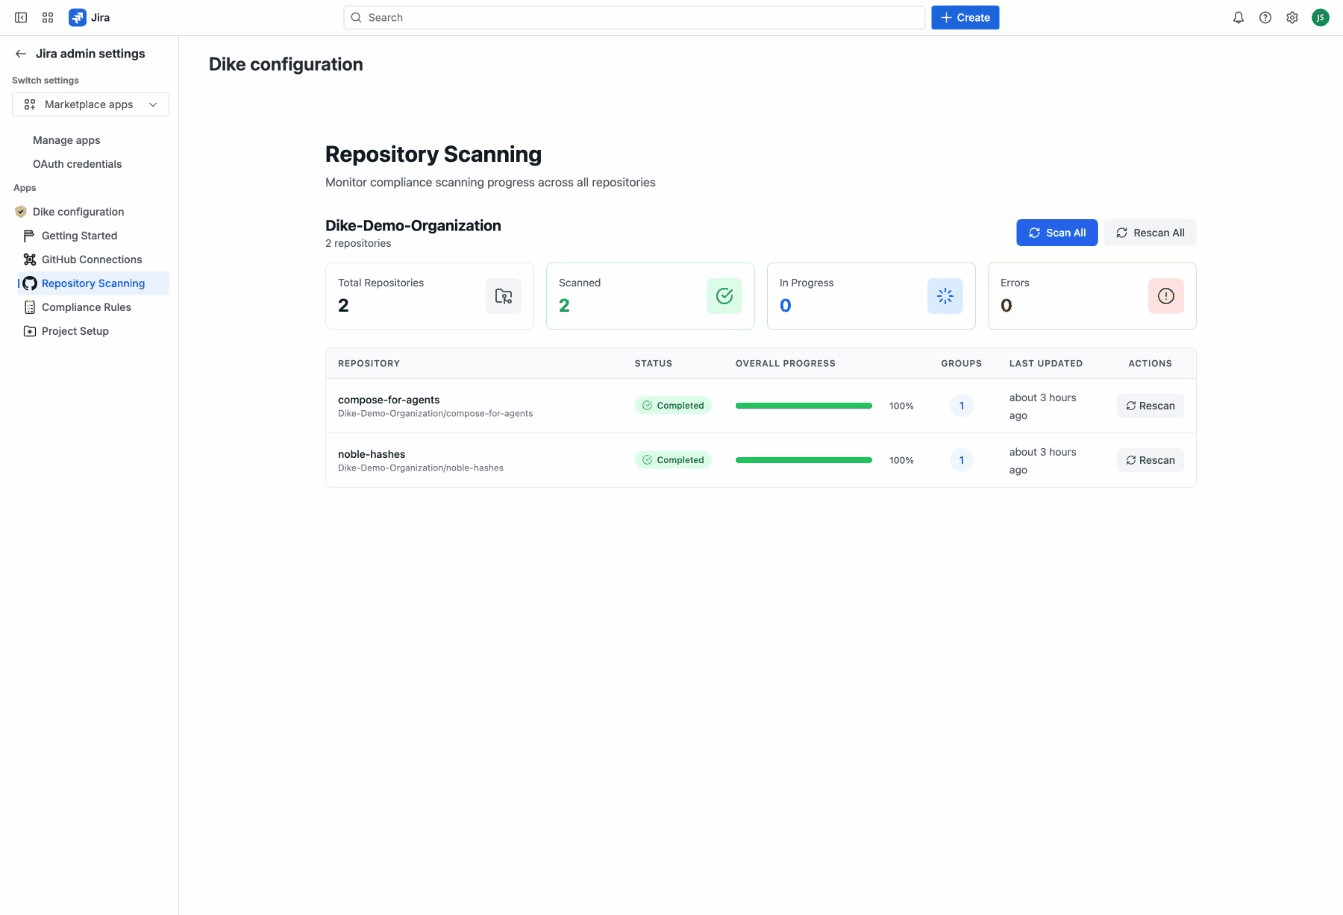
Once GitHub is connected, Dike automatically discovers repositories from your organizations.
Viewing Repositories
Go to Repository Scanning tab to see all available repositories grouped by organization.
Repository information displayed:
- Repository name and full path
- Activity level (very active, active, low activity, archived)
- Scan progress and status
Repository Scope for Rules
When configuring compliance rules, you choose which repositories the rules apply to.
Scope options:
| Option | Description | Best For |
|---|---|---|
| All Repositories | Rules apply to all current and future repositories | Most users - ensures complete coverage |
| Selected Repositories | Rules apply only to manually selected repositories | When you need precise control |
We recommend All Repositories for most users. New repositories are automatically included, reducing the risk of compliance gaps. Use exclusion patterns to opt-out specific repositories if needed.
Branch Scope
Control which branches are monitored for compliance:
| Option | Description |
|---|---|
| All Branches | Monitor commits and PRs on all branches |
| Selected Branches | Monitor only specific branch patterns |
Branch patterns use glob syntax:
main- Exact matchrelease/*- All release brancheshotfix/*- All hotfix branchesfeature/**- All feature branches including nested paths
Compliance Rules Configuration
Rules are the core of Dike's compliance monitoring. They define what violations to detect and how to respond.
Rule Groups
Rules are organized into Rule Groups - collections of related rules that share repository scope.
Creating a Rule Group:
- Go to Compliance Rules tab
- Click Create Rule Group - a new group appears with default name "NEW RULE GROUP"
- Click the ⋮ (three-dots menu) on the new group
- Select Edit to configure:
- Name: Descriptive name (e.g., "SOC2 Compliance")
- Icon: Visual identifier
- Description: Explanation of what the group covers
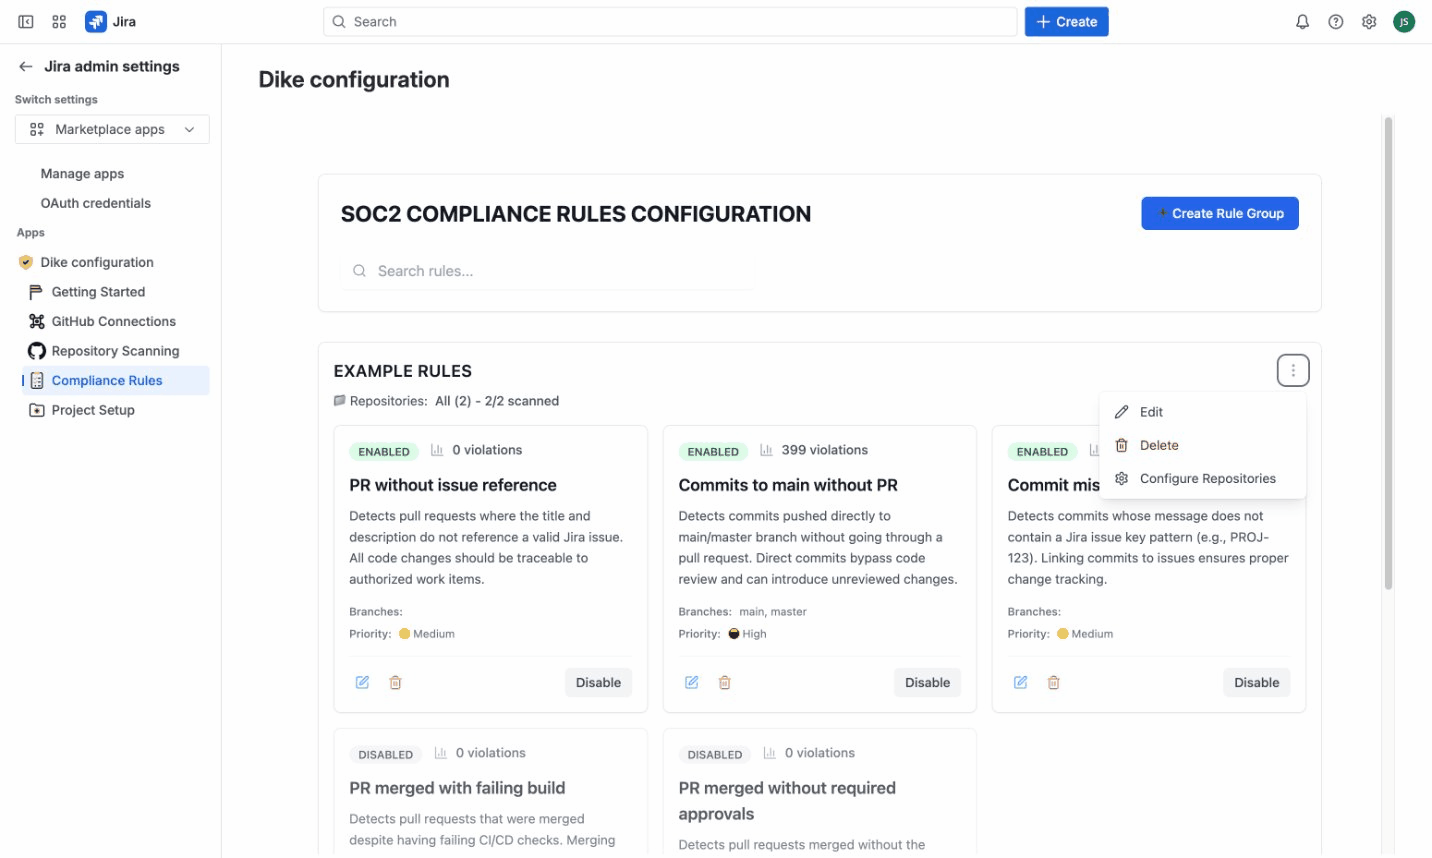
Rule Group menu options:
- Edit - Change name, icon, color, and description
- Delete - Remove the group and all its rules
- Configure Repositories - Set which repositories this group monitors
Rule Group settings:
- Repository scope (all or selected repositories)
- Branch patterns (which branches to monitor)
- File exclusions (paths to ignore)
Creating Rules
Each rule defines a specific compliance check.
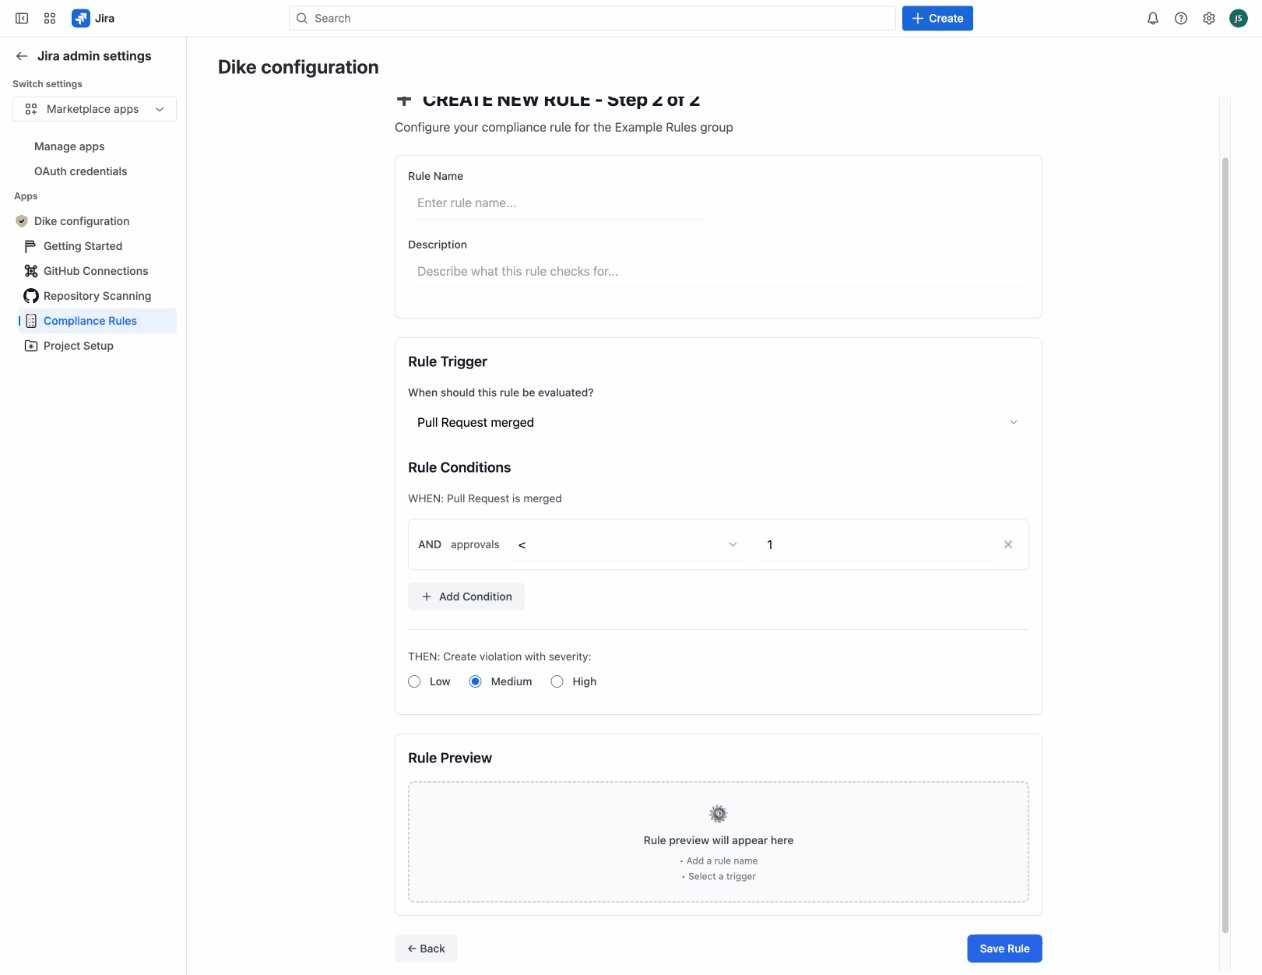
Rule settings:
| Setting | Description |
|---|---|
| Name | User-friendly name for the rule |
| Description | What the rule checks |
| Status | Enabled or Disabled |
| Priority | High, Medium, or Low |
| Trigger | When the rule is evaluated |
| Conditions | What constitutes a violation |
| Actions | What happens when a violation is detected |
Rule Triggers
Triggers define when a rule is evaluated:
| Trigger | Evaluated When |
|---|---|
pr_merged | A pull request is merged |
pr_created | A new pull request is opened |
commit_pushed | A commit is pushed to a branch |
Rule Conditions
Conditions define what constitutes a violation. Available conditions depend on the trigger type.
Pull Request Conditions (for pr_merged and pr_created)
| Condition | Description | Example |
|---|---|---|
| Approvals | Number of PR approvals | Less than 1 approval |
| File Changes | Lines or files changed | More than 500 lines changed |
| Age | How long PR has been open | Open for more than 7 days |
| Author | Who created the PR | Author equals "bot" |
| Missing Issue Key | PR lacks issue reference pattern | Title doesn't contain PROJ-123 format |
| Missing Issue | Issue key doesn't exist in Jira | Referenced issue not found |
| Branch Name | Branch naming pattern | Branch doesn't match feature/* |
| Build Status | CI/CD status | Build status equals FAILURE |
| Labels | PR labels | Missing "approved" label |
| Title/Body | PR content | Title contains "WIP" |
Commit Conditions (for commit_pushed)
| Condition | Description | Example |
|---|---|---|
| Missing Issue Key | Commit message lacks issue reference | No PROJ-123 in message |
| Missing Issue | Issue key doesn't exist in Jira | Referenced issue not found |
| Without PR | Commit pushed directly without PR | Direct push to main |
| Branch Properties | Branch name pattern | Pushed to main branch |
Condition Operators
| Operator | Use With | Example |
|---|---|---|
equals | Exact match | Status equals "FAILURE" |
not-equals | Exclude match | Author not-equals "dependabot" |
less-than | Numeric comparison | Approvals less-than 1 |
greater-than | Numeric comparison | File changes greater-than 500 |
contains | Partial match | Labels contains "urgent" |
matches | Regex pattern | Branch matches ^release/.* |
Rule Actions
Actions define what happens when a violation is detected:
| Action | Description |
|---|---|
| Create Violation | Record the violation in Dike (always enabled) |
| Notify | Send notifications to specified recipients |
Severity levels:
- High: Critical compliance issues requiring immediate attention
- Medium: Standard violations that should be addressed
- Low: Minor issues for awareness
Exclusion Patterns
Exclude specific files or paths from compliance scanning using glob patterns.
Common exclusions:
| Pattern | What it Excludes |
|---|---|
*.md | All markdown files |
docs/** | Documentation folder |
.github/** | GitHub configuration files |
test/** | Test files |
*.test.ts | Test files by extension |
Pre-configured Example Rules
Dike includes example rules for common SOC2 compliance checks:
- Commits to main without PR - Detects direct pushes bypassing code review
- PR merged with failing build - Detects merges despite failed CI/CD
- PR merged without approvals - Detects insufficient code review
Example rules are disabled by default. Enable the rules you need in the Compliance Rules tab.
User Roles and Permissions
Who Can Access Dike
Dike configuration requires administrative access. A user can access Dike if they have either:
- Jira Global Administrator permission
- Dike Administrator permission (can be granted to non-Jira-admins)
Permission Capabilities
| Action | Jira Admin | Dike Admin | Regular User |
|---|---|---|---|
| Access Dike configuration | ✅ | ✅ | ❌ |
| Configure GitHub connections | ✅ | ✅ | ❌ |
| Create/edit rule groups | ✅ | ✅ | ❌ |
| Create/edit rules | ✅ | ✅ | ❌ |
| View violations | ✅ | ✅ | ❌ |
| Acknowledge/resolve violations | ✅ | ✅ | ❌ |
| Manage Jira project settings | ✅ | ✅ | ❌ |
Delegating Dike Administration
To allow non-Jira-admins to manage Dike (e.g., compliance team members):
- Contact your Jira administrator
- Request Dike admin permission be granted to specific users
- Those users will then have full Dike configuration access
Permission checks are cached for 5 minutes for performance. If permissions are changed, users may need to refresh or wait briefly for changes to take effect.
Configuration Best Practices
Rule Organization
- Create separate groups for different compliance areas (SOC2, Security, Code Quality)
- Use descriptive names that explain what the group monitors
Repository Scope
- Use "All Repositories" unless you have specific exclusion needs
- Add exclusions rather than manually selecting repositories
- Review scope regularly when onboarding new repositories
Rule Design
- Start simple - begin with basic conditions and add complexity as needed
- Set appropriate severity - reserve "High" for critical compliance issues
- Document rules - use descriptions to explain why rules exist
Exclusion Patterns
- Exclude internal documentation - internal docs and notes, but keep public documentation under compliance rules
- Exclude automated commits - bot commits, version bumps
- Be specific - avoid overly broad patterns that might hide real issues